Old Fashioned Cream Horns
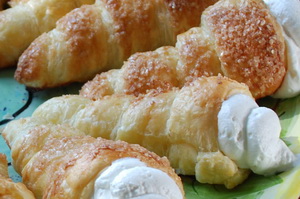
What on earth is a cream horn? After months of John begging for me to make cream horns, I still wasn’t quite sure what he was talking about. I figured out that it was a pastry filled with cream. But I was imagining an eclair or cream puff. What I learned, after extensive internet research, is that a cream horn is made with a puff pastry exterior and filled with any number of creamy pastry fillings- pastry cream, custard, sweetened whipped cream, or butter cream. They can be topped with fruit, chocolate sprinkles, or sugar crystals. I also discovered that they are sometimes called lady locks or clothespin cookies. I did not find an accurate history of the cream horn, but I got the impression that they have been around for a while.
In making my first cream horns, I discovered that they are simple to prepare, but take long time. They are best made when you have a whole day at home and lots of other things to do! They also are best eaten the same day they are made. You can, however, freeze the dough after cutting and wrapping it around the molds. The baking and filling part takes relatively little time compared to the dough preparation.
You can purchase metal molds for the horns to hold their shape while baking. I got mine at the cooking store for $3. This recipe makes 6-8 cream horns depending on how thinly you roll the dough and how sparsely you wrap the cones. I pieced together this recipe from various sources- including The French Pastry Chef, Gale Gand, and Scandicrafts.
These pastries are so light and crispy and creamy and delicious! They disappear quickly… and John is already begging for more!
For the Horns:
- 2 cups flour
- 1/2 teaspoon salt
- 1 teaspoon lemon juice
- 2/3 cup ice water
- 1 cup unsalted butter at room temperature
- 1 egg
- 1 tablespoon water
- Sugar crystals for sprinkling
- Wax paper
- Unsalted utter for greasing cones
For the Cream:
- 1 cup whipping cream
- 2 tablespoons sugar
To Make the Horns:
- Mix flour and salt in large bowl.
- Make a well in the center and pour in the lemon juice and water.
- Mix flour and water with fingertips to make a soft dough.
- Form dough into a ball, cover completely with plastic wrap, and refrigerate for 20 minutes.
- Lightly flour the butter and place between two sheets of wax paper, set aside.
- After chilled, remove dough from refrigerator and place on lightly floured smooth surface.
- Roll out dough leaving the center a little bit thicker.
- Remove wax paper from butter and place the butter in the center of the dough.
- Fold dough around butter on all sides, like an envelope.
- Roll out dough into a rectangle, about 18 inches.
- Fold the dough in thirds, like a letter.
- Turn dough one quarter turn and roll out into a rectangle, about 18 inches.
- Fold the dough in thirds, like a letter.
- Wrap the dough in plastic wrap and refrigerate for 40 minutes.
- Repeat steps 10-14 two more times.
- Roll out dough into a 10 by 15 inch rectangle about 1/8 inch thick.
- Cut dough lengthwise into 1 inch wide strips using a pizza or pastry wheel.
- Grease cones with unsalted butter.
- Wrap each strip of dough around the cone, starting at the bottom and overlapping slightly all the way to the top.
- Pinch the bottom and top to make sure the dough doesn’t come unraveled.
- Place horns, sealed side down, on a baking sheet and refrigerate for 30 minutes. (At this point, you can freeze the horns for later baking or continue with the baking in the next steps.)
- Preheat oven to 400 degrees.
- Whisk the egg and tablespoon of water together in a small bowl, set aside.
- Remove horns from the refrigerator.
- Brush horns with the egg wash.
- Sprinkle sugar crystals over the top of the horns.
- Bake about 15 minutes, or until golden brown.
- Remove from oven and transfer to cooling rack, leaving cones in for 10 minutes.
- Remove cones from horns and let cool completely.
To Make the Cream:
- Pour whipping cream and sugar into a stand mixer bowl fitted with a whisk attachment.
- Mix on high speed until stiff peaks form.
- Fill a pastry bag with the whipped cream.
- Pipe the cream into the cooled horns.


 (63 votes, average: 3.29 out of 5)
 I am a lover of all things sweet- baking, eating and gazing at homemade treats is one of my favorite past times!
I do have a day job (that doesn't involve baking) so my culinary adventures are pretty much limited to the weekends when I have the most time.
I have started this blog to share good recipes with friends and family and to learn from others how to make them even better.
Thanks for stopping by and doing your part to make the world a sweeter place!
-Kricket
November 13th, 2008 at 11:22 pm
These were delicious. They were so light and fluffy. Yummy!