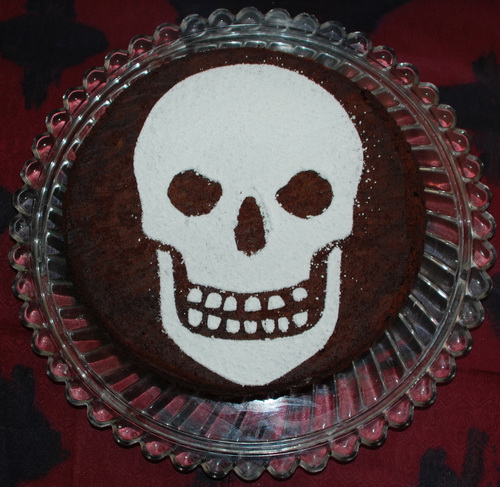
Spicy Skull Cake
A couple of weeks ago, I was browsing magazines in the airport when I came across a special party food issue of Sunset. Flipping through it, not much stood out to me besides this amazing skull chili chocolate cake. Yum! I refused to spend $10 on the magazine for one recipe, so I diligently wrote it down on a small scrap of paper.
When I got home and actually made the recipe, I was a little concerned that maybe I had left out at ingredient or wrote down the amounts wrong. But it turned out splendidly!
Despite all the chilis, this cake actually isn’t that spicy. It has a subtle kick that hits you about a minute after you start eating it. A subtle, good kick. It is soooo chocolately and dense which makes the whipped cream a perfect companion.
I had a hard time finding a skull stencil, so with the help of Melissa, I made my own. We used an outline from the internet, adjusted it in photoshop, transferred it to cardstock and cut it out with an exacto knife. I know that seems like a lot of work, but I’m holding onto that stencil for future cakes!
Make sure you have friends to share this one with because it is rich! I would say it makes at least 12 large or 18 small servings.
For the Whipped Cream:
- 1 cup heavy whipping cream
- 1 tablespoon sugar
- 1 teaspoon vanilla
For the Spicy Skull Cake:
- 3 1/2 oz dried pasilla chilis
- 1 lb semisweet chocolate, chopped
- 3/4 cup unsalted butter
- 5 eggs, separated
- 2 teaspoons vanilla
- 1 1/2 tablespoons flour
- 1/2 cup dark brown sugar
- 1/4 teaspoon cream of tartar
For the Decoration:
- 1/2 cup powdered sugar
- stencil for cake decoration
To Make the Whipped Cream:
- Beat whipped cream, sugar and vanilla in a stand mixer with a whisk attachment until stiff peaks form.
- Store in refrigerator until ready to serve.
For the Spicy Skull Cake:
- Preheat oven to 400 degrees.
- Lay dried chilis on a cookie sheet and bake for two minutes.
- Remove from oven and turn oven up to 425 degrees.
- Break off stems of chilis and shake out seeds.
- Break chilis into small pieces and place in a small bowl.
- Cover chilis in warm water and soak for 7 minutes.
- Drain chili pieces and blend in blender with 1/3 cup water until a smooth paste is formed.
- Push chili paste through a strainer, set aside.
- Line bottom and sides of a 9 inch spring form cake pan with parchment paper, set aside.
- Melt chocolate and butter in double boiler.
- Remove from heat and whisk in chili paste, egg yolks, vanilla and flour.
- Beat egg whites and cream of tarter in a stand mixer with a whisk attachment on high until foamy and frothy.
- Slowly beat in brown sugar and continue beating until stiff peaks are formed.
- Fold 1/3 of egg white mixture into chocolate mixture.
- Fold in the remaining whites until no streaks remain.
- Pour batter into cake pan and spread evenly.
- Bake for 15 minutes or until sides are set and center is still wiggly.
- Cool for at least 30 minutes on wire rack.
- Chill in refrigerator for at least 4 hours.
- Place the stencil on the cake and shake the powdered sugar over the cake with a sieve or sifter.
- Carefully remove the stencil.
- Serve with whipped cream.


 I am a lover of all things sweet- baking, eating and gazing at homemade treats is one of my favorite past times!
I do have a day job (that doesn't involve baking) so my culinary adventures are pretty much limited to the weekends when I have the most time.
I have started this blog to share good recipes with friends and family and to learn from others how to make them even better.
Thanks for stopping by and doing your part to make the world a sweeter place!
-Kricket
November 3rd, 2008 at 11:37 pm
This cake was awesome! It was dense, like a flourless chocolate cake should be, but the one I made recently turned out more like a fat chocolate bar. This one still had a little fluff to it and was very chocolaty. The chili added a great kick but wasn’t too much and the whip cream served with it was the perfect balance. As always, Kricket Cakes rock.
November 4th, 2008 at 12:41 pm
I had some of this cake. It was f___’n awesome
November 19th, 2008 at 9:55 am
This one takes it! Unbelievable! What’s on for Thanksgiving? The ultimate p.p? Or how about bb muffins? Get goin! Miss you! slpk
December 22nd, 2008 at 5:43 am
Wow, this is cool. I hope I get to see this next year. Nice site too!