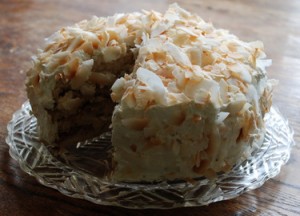
4 Layer Carmelite Monastery Cake
Hi Everyone!
Welcome to my very first baking blog post! I am interested in hearing your feedback about this recipe (don’t worry, they won’t all be this ambitious!)
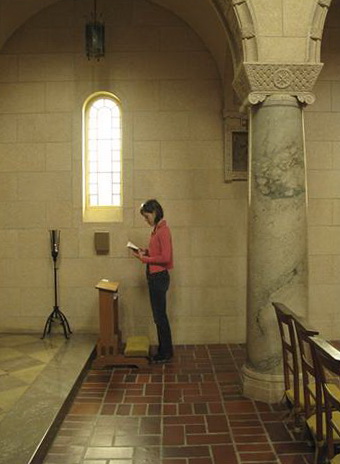
A few weeks ago, as John and Mike rode their bikes from Santa Cruz to Monterey, Alison and I adventured off for a lovely stroll in the Point Lobos State Reserve in Carmel. We spotted an interesting looking church in the distance and attempted to walk there, but were stopped by the chain link park fence. On our drive from Carmel to Monterey, we decided to stop and take a closer look at this old structure nestled amongst the hills and trees overlooking the Monterey Bay.
 The Order of the Brothers of Our Lady of Mount Carmel was founded in the 12th century on Mount Carmel, Israel. The Carmelite Monastery in Carmel, California was built in 1931 and is still home to cloistered nuns. It is very simple and elegant, with quaint garden walking paths, abalone shell sculptures and a small chapel. We were excited about the rows of individual sitting and prayer chairs in lieu of pews in the chapel. The colors were very soothing- lots of whites and creams and tans and browns with touches of green and yellow in the simple stained glass windows. As we were leaving, Alison and I brainstormed what kind of dessert would best represent the Carmelite Monastery. At first we thought of something dense and chewy, but settled on something lighter but a little rustic. We new it had to be super carmely, and don’t worry, this is!
Oh, my pet peeve is a blog that never gets to the point. On to the recipe!
Carmelite Filling
The Carmelite Filling takes a while to cool, so it is best to make it first. This recipe is based on the Butterscotch Filling recipe from the Magnolia Bakery. It is rich and sweet, perfect for a cake with a not-so-sweet whipped topping.
- ¼ stick unsalted butter
- ½ cup packed dark brown sugar
- 1 cup whole milk at room temperature
- 2 eggs at room temperature
- 3 tablespoons flour
- ½ teaspoon salt
- ½ teaspoon vanilla extract
- 1 ½ cups chopped pecans
- Whisk the flour, salt and one cup of the milk together in a small bowl until smooth, set aside.
- Whisk the eggs together until lightly beaten in another small bowl, set aside.
- Melt butter over low heat in a medium saucepan.
- Add sugar and whisk until well combined and starting to melt, about 2 minutes.
- Whisk in 1 cup of the milk until well combined. Continue cooking over low heat for about 4 minutes.
- Add the flour and milk mixture to the saucepan whisking constantly until thickened, about 15 minutes. The mixture will turn a more solid, darker caramel color.
- Whisk in the eggs and cook another 2 minutes.
- Remove saucepan from the heat and cool for 10 minutes, stirring 3 or 4 times.
- Whisk in the vanilla extract and pecans.
- Cover and refrigerate until cool, at least 2 ½ hours.
Monastery Cake
While the Filling is cooling, you can make the cake. This recipe is based on the Old Fashioned White Cake recipe from the Magnolia Bakery. It has simple ingredients and is a light cake that goes well with the whipped cream and caramel.
- 2 cups flour
- 1 cup whole milk at room temperature
- 4 egg whites at room temperature
- 1 ½ cups sugar
- 1 stick unsalted butter at room temperature
- 3 teaspoons baking powder
- 1 teaspoon salt
- 2 teaspoons vanilla extract
- Preheat oven to 350 degrees and place oven rack in center.
- Grease and flour 2 9-inch round cake pans. If not using springform pans, cut 2 rounds of parchment paper and place in each pan.
- Combine milk and vanilla in a cup, set aside.
- Whisk or sift flour, salt and baking powder in a small bowl, set aside.
- In electric stand mixer with paddle attachment, or hand mixer, beat the butter on low until smooth, about 1 minute.
- Add sugar and beat until light and fluffy, about 4 minutes.
- With mixer running, alternate additions of the flour mixture and milk mixture in thirds, making sure to mix until just combined after each addition.
- Move ingredients to a large bowl if using stand mixer. Clean stand mixer bowl and dry thoroughly.
- Beat egg whites on high using whisk attachment in stand mixer or hand mixer in a large bowl until soft peaks form, about 3 minutes.
- Fold egg whites into batter, making sure to combine whites with batter but not to overmix.
- Divide batter evenly between the two pans. Bake for 18-24 minutes or until a toothpick inserted in the center of the cakes comes out clean.
- Cool cakes in pans for 10 minutes. Remove cakes from pans to wire cooling rack using either spring release and a spatula or by flipping the pans over and gently tapping the bottom until the cakes release. Cool completely, at least 1 ½ hours.
Whipped Topping and Toasted Coconut Shavings
While the cake is baking, you can whip up the Topping. (Oh, how I love to multi-task!)
- 1 ½ cups whipping cream, chilled
- 2 cups unsweetened flaked coconut
- 1 tablespoon sugar
- 1 teaspoon vanilla
- Preheat oven to 325 degrees.
- Spread flaked coconut in a thin layer on a large baking sheet.
- Bake until lightly brown on the edges, approximately 4 minutes, removing from the oven every 2 minutes to stir. Cool completely.
- Place whipping cream, sugar and vanilla in medium bowl or electric mixer bowl.
- Whisk by hand or using mixer until very firm peaks form. Store whipped mixture in refrigerator until ready to use.
Assembly
- When cake is completely cooled, carefully slice each layer in half horizontally with a serrated knife. Place one layer on a cake plate.
- Top with a thin layer of Carmelite Filling (it is very sweet, so don’t go crazy with it).
- Top with second cake layer, then filling, third layer, filling and then the top layer of the cake. (For a less sweet cake, don’t cut cakes in half and only spread half of the filling between the two layers.)
- Spread Whipped Topping evenly over top and sides of cake.
- Sprinkle top and sides with Coconut Shavings.
- Eat right away or store in refrigerator for up to 1 week. (I actually thought this cake tested better the second day.) I strongly recommend sharing this dessert with friends as it is decadent!


 I am a lover of all things sweet- baking, eating and gazing at homemade treats is one of my favorite past times!
I do have a day job (that doesn't involve baking) so my culinary adventures are pretty much limited to the weekends when I have the most time.
I have started this blog to share good recipes with friends and family and to learn from others how to make them even better.
Thanks for stopping by and doing your part to make the world a sweeter place!
-Kricket
August 21st, 2008 at 9:57 pm
Sounds delicious! It might go well with tamales, yes?? Maybe I’ll be so kind as to bring
you one or two from the tamale appointment on Sunday. Will miss you. Love the blog. You
are so cute!
August 22nd, 2008 at 1:51 am
Yeah, the blog is lookin’ pretty sweet, but not as sweet as that awesome cake. I’m lucky i get to sample all yer creations.
August 22nd, 2008 at 3:13 pm
Wow, what an adorable blog. And what a yummy looking cake! It would be interesting to see what kind of dessert you could come up with that would best represent Los Gallos Monastery in beautiful Scotts Valley.
August 22nd, 2008 at 6:18 pm
Your cake sounds delicious! So sorry to have missed out on the taste-testing experience!! Perhaps next time?? Anyway, I love your new site. Stripes and logo are a perfect match! But, let me ask you this…how important is it to use the paddle attachment? I don’t have the paddles, so I either ignore that direction or I skip the recipe. What has been your experience?
August 23rd, 2008 at 10:12 pm
@Rachel Eloise
Well, I highly recommend that at some point you get the paddle attachment just because it is so useful in cake and cookie making, but for now, this recipe can definitely be made well without it. It is most important to not overmix the batter once the flour has been added. Overmixing can cause the gluten to develop, resulting in a tough cake. So, you have the option of mixing at very low speed or mixing by hand (doubles as a great forearm workout). Whatever you decide, don’t let a silly little paddle should stop you from making this awesome cake!
August 26th, 2008 at 11:33 am
I am recalcitrant in my taste-testing duties… sorry!
I LOVED the coconut cake. The coconut shavings were substantial, like you whittled ‘em yourself rather than the sometimes annoying saw-dusty type of coconut you often see on cakes.
It was a SWEETIE–definitely needed a good coffee drink or coffee substitute (yeah!) to go with. And the whipped ‘topping’ (mine came out of a plastic container..so it was more like a delicious cake-scramble!) was divine. I guess that’s where the monastary thing comes in.
August 31st, 2008 at 10:57 pm
Your cake looks Super! and represents the Carmelite monastery well. Great blog.
Cheers!!
September 1st, 2008 at 1:31 pm
I was fortunate enough to have a piece of Kricket’s cake and it was scrumptious. I didn’t want to share with my family, but felt guilty about that, so shared and everyone loved it. The flavors melded perfectly… it was intense yet delicate at the same time. We loved the caramel and the coconut together. Yum!
Oh, and the blog is just as sweet as the creations and Kricket herself!